> ## Documentation Index
> Fetch the complete documentation index at: https://docs.withterminal.com/llms.txt
> Use this file to discover all available pages before exploring further.
# Link Component
> Terminal provides a hosted 'Link' that makes it easy to authenticate with any telematics provider. With only a few steps you will be able to provide customers/partners an easy self-serve flow to connect their telematics account.
## Accessing Terminal Link
Terminal Link is a user-friendly, hosted page designed to facilitate authentication with any telematics provider. It provides a simple, self-serve flow for customers or partners to connect their telematics accounts.
You have two options to integrate Terminal Link into your application:
1. Directly link to the hosted page.
2. Embed it within your application using one of our SDKs.
Terminal provides a React hook that makes it easy to embed the link in your application.
View the package on NPM here: [`@terminal-api/link-react`](https://www.npmjs.com/package/@terminal-api/link-react)
### Installation
```bash theme={null}
npm install @terminal-api/link-react
```
## Usage
### Creating a Connection
Terminal handles capturing, validating and securely storing customer's credentials to ensure that each TSP integration is as consistent as possible.
Here's an overview of the steps involved when using the React hook:
**Steps**
1. Initialize auth link with desired options (see available options below)
2. Open link and wait for user to complete authentication
3. Handle `onSuccess` callback and exchange public token for a connection token on your backend using [`POST /tsp/v1/public-token/exchange`](/api-reference/authentication/public-token-exchange)
### Re-Authenticating a Connection
In certain scenarios, connections may become disconnected. This can occur when customers modify their password or withdraw access.
In such cases, Terminal updates the Connection status to `disconnected` and prompts you to reauthenticate the customer's TSP to continue syncing.
The reauthentication process mirrors the link flow, but requires the `connectionId` parameter to specify which connection needs to be updated.
### Examples
```tsx Create a Connection theme={null}
import { useCallback } from 'react';
import { useTerminalLink } from '@terminal-api/link-react';
const MyComponent = () => {
const api = useYourBackendApi();
// if you are defining the function inside the component
// make sure to wrap it in useCallback
const exchangeToken = useCallback(
async ({ publicToken }: { publicToken: string }) => {
// Send the public token to your backend to exchange for a connection token
// and store it in your database.
return await api.post('/api/terminal', { publicToken });
},
[api],
);
const terminal = useTerminalLink({
// production or sandbox publishable key from the Terminal dashboard
publishableKey: process.env.REACT_APP_TERMINAL_PUBLISHABLE_KEY,
onSuccess: exchangeToken,
params: {
// optional parameters
externalId: 'my-external-id',
},
});
return (
);
};
export default MyComponent;
```
```tsx Re-authenticate a Connection theme={null}
import React from 'react';
import { useTerminalLink } from '@terminal-api/link-react';
const MyComponent = ({ onSuccess }: { onSuccess: () => void }) => {
const terminal = useTerminalLink({
// production or sandbox publishable key from the Terminal dashboard
publishableKey: process.env.REACT_APP_TERMINAL_PUBLISHABLE_KEY,
connectionId: 'conn_01GSKTHCD24NRZ2SBJTPZBCQ1R',
onSuccess, // token exchange is optional for re-authentication
});
return (
);
};
export default MyComponent;
```
## Available Options
The link SDK provides a number of options to customize the behavior of the link.
Your publishable key.
Optional connection ID to update. If not provided, a new connection will be
created.
Base URL for the link. Defaults based on the publishable key (production or
sandbox).
Called when link is successfully completed.
Called when the link is exited by the user.
Called when the link is opened.
Called when the link is closed.
Optional override for the sync mode. Defaults to account's default sync mode.
Name of the company to associate with the connection.
Optional external ID to associate with the connection (e.g., your organization ID). You can learn more about External IDs [here](/terminal-platform/custom-identifiers).
A list of tags that can be used to associate searchable references or categories to your connections. (e.g., `['organizationId', 'Business Unit A']`). You can learn more about tags [here](/terminal-platform/custom-identifiers).
Optional provider to filter the list of providers (e.g., 'geotab').
A list of provider codes that will be hoisted to the top of the provider selection list.
Number of days for backfill. Defaults to 0.
Date to start backfilling from. Defaults to current date.
Optional template ID to apply to the connection. If provided, the template's
settings will be used for branding, custom agreements, and default values.
Learn more in the [Consent Templates guide](/guides/consent-templates).
Terminal provides a javascript SDK that makes it easy to embed the link in your application.
View the package on NPM here: [`@terminal-api/link-sdk`](https://www.npmjs.com/package/@terminal-api/link-sdk)
### Installation
**NPM**
```bash theme={null}
npm install @terminal-api/link-sdk
```
**Script Tag**
```html theme={null}
```
## Usage
### Creating a Connection
Terminal handles capturing, validating and securely storing customer's credentials to ensure that each TSP integration is as consistent as possible.
Here's an overview of the steps involved when using the JS SDK:
**Steps**
1. Initialize auth link with desired options (see available options [below](#available-options))
2. Open link and wait for user to complete authentication
3. Handle `onSuccess` callback and exchange public token for a connection token on your backend using [`POST /tsp/v1/public-token/exchange`](/api-reference/authentication/public-token-exchange)
### Re-Authenticating a Connection
In certain scenarios, connections may become disconnected. This can occur when customers modify their password or withdraw access.
In such cases, Terminal updates the Connection status to `disconnected` and prompts you to reauthenticate the customer's TSP to continue syncing.
The reauthentication process mirrors the link flow, but requires the `connectionId` parameter to specify which connection needs to be updated.
### Examples
```ts Create a Connection theme={null}
// import if using package or will be globally available if installed via script tag
import { TerminalLink } from '@terminal-api/link-sdk';
async function exchangePublicToken(publicToken) {
// provide the public token to your backend to exchange for a Terminal connection token
// store the Terminal connection token in your database to use for future Terminal API requests
const response = await fetch('/api/create-terminal-connection', {
method: 'POST',
body: JSON.stringify({ publicToken }),
});
return response.json();
}
const link = TerminalLink.initialize({
// production or sandbox publishable key from the Terminal dashboard
publishableKey: process.env.TERMINAL_PUBLISHABLE_KEY,
onSuccess: (result) => exchangePublicToken(result.publicToken),
});
link.open();
```
```ts Re-authenticate a Connection theme={null}
// import if using package or will be globally available if installed via script tag
import { TerminalLink } from '@terminal-api/link-sdk';
async function exchangePublicToken(publicToken) {
// provide the public token to your backend to exchange for a Terminal connection token
// store the Terminal connection token in your database to use for future Terminal API requests
const response = await fetch('/api/create-terminal-connection', {
method: 'POST',
body: JSON.stringify({
publicToken,
}),
});
return response.json();
}
const link = TerminalLink.initialize({
// production or sandbox publishable key from the Terminal dashboard
publishableKey: process.env.TERMINAL_PUBLISHABLE_KEY,
connectionId: 'conn_01GSKTHCD24NRZ2SBJTPZBCQ1R',
onSuccess: (result) => exchangePublicToken(result.publicToken),
});
link.open();
```
## Available Options
The link SDK provides a number of options to customize the behavior of the link.
Your publishable key.
Optional connection ID to update. If not provided, a new connection will be
created.
Base URL for the link. Defaults based on the publishable key (production or
sandbox).
Called when link is successfully completed.
Called when the link is exited by the user.
Called when the link is opened.
Called when the link is closed.
Optional override for the sync mode. Defaults to account's default sync mode.
Name of the company to associate with the connection.
Optional external ID to associate with the connection (e.g., your organization ID). You can learn more about External IDs [here](/terminal-platform/custom-identifiers).
A list of tags that can be used to associate searchable references or categories to your connections. (e.g., `['organizationId', 'Business Unit A']`). You can learn more about tags [here](/terminal-platform/custom-identifiers).
Optional provider to filter the list of providers (e.g., 'geotab').
A list of provider codes that will be hoisted to the top of the provider selection list.
Number of days for backfill. Defaults to 0.
Date to start backfilling from. Defaults to current date.
Optional template ID to apply to the connection. If provided, the template's
settings will be used for branding, custom agreements, and default values.
Learn more in the [Consent Templates guide](/guides/consent-templates).
The easiest way to get started with Terminal is to redirect your users to our hosted link. This is a great option if you don't want to embed the link in your application or if you are using a language that we don't have an SDK for.
We will handle the entire authentication flow and redirect the user back to your application when they are done.
## Usage
### Creating a Connection
Terminal handles capturing, validating and securely storing customer's credentials to ensure that each TSP integration is as consistent as possible. Here's an overview of the steps involved in that flow.
**Steps**
1. Create auth link with desired options (see available options below)
2. Ask user to login to their TSP and direct to link
3. User is redirected back to the `redirect_url` with the following paramaters:
* `result`: Indicates the outcome of the authentication process. It will be either:
* `success`: The user successfully authenticated.
* `exit`: The user exited the authentication process without completing it.
* `token`: A public token that is provided when `result === success`. This token is used to exchange for a connection token on your backend.
* `state`: An opaque value that you can set in the link params for additional security:
* If provided in the initial request, it will be returned unchanged.
* You should compare the returned state with the one you initially set.
* If they don't match, it may indicate a potential security issue (e.g., a CSRF attack), and you should abort the authentication process.
4. Pass public token to your backend and exchange public token for a connection token
5. Wait for initial sync to complete by either:
* Polling `/connections/current` until sync is `complete`
* Subscribing to `sync.completed` webhooks ([docs](/terminal-platform/webhooks))
6. Ingest data from Terminal
**Example Link**
Here's an example of a Link URL for authenticating new connections:
```
https://link.sandbox.withterminal.com/?key={PUBLISHABLE_KEY}&redirect_url={URL}
```
### Re-Authenticating a Connection
There are rare times where connections may get disconnected. Common reasons for this include when customers change their password or revoke access.
When this happens - Terminal will update the status of the Connection to `disconnected` and prompt you to reauthenticate the customer's TSP in order to resume syncing.
Reauthentication is similar to the link flow but includes the `connectionId` in the URL path to denote which connection you would like to update.
**Steps**
1. Get re-auth link for disconnected connection (see example below)
2. Explain to user they need to enter their credentials again and direct them to link to perform authentication
3. Resume ingesting data after catch up sync completes
**Example Link**
Here's an example of a Link URL for re-authenticating existing connections:
```
https://link.sandbox.withterminal.com/connection/conn_01GSKTHCD24NRZ2SBJTPZBCQ1R?key={PUBLISHABLE_KEY}&redirect_url={URL}
```
**Special Note**
During re-auth, you must link the same TSP account. Should your customer want to change accounts then they will need to create a new connection
### Available Options
You can use the following options when directing customers to the link in order to control behaviour. Please note these settings do not apply to the re-authentication flow.
#### Base URL
The base URL for the link is determined by the environment you are using. You can use the following table to determine which environment you should use.
Our SDKs automatically determine the correct base URL based on the publishable key you provide.
| Environment | URL |
| ----------- | ------------------------------------------------------------------------------------------ |
| `prod` | `https://link.withterminal.com/?key={PUBLISHABLE_KEY}&redirect_url={REDIRECT_URL}` |
| `sandbox` | `https://link.sandbox.withterminal.com/?key={PUBLISHABLE_KEY}&redirect_url={REDIRECT_URL}` |
#### Query Parameters
The following options can be appended as query parameters to the link URL in order to modify the settings of the resulting connection.
Your application's publishable key
Example: `pk_prod_SDFsdflokjsdfloiLKDNF`
Where you want to direct users after they succesfully complete or exit the link flow. This is required for initial authentication in order to exchange the public token but is optional during re-authentication.
Example: `https://app.example.com/telematics-success`
Optional state parameter for maintaining application state and preventing CSRF
attacks. This opaque value is returned unchanged, allowing verification of the
request source. It should be unique for each flow initiation.
A friendly name to give the resulting connection - if not provided, we will
attempt to pull this from the TSP
ID field to reference an identifier from your system with the resulting
connection. You can learn more about External IDs
[here](/terminal-platform/custom-identifiers).
A list of tags that can be used to associate searchable references or
categories to your connections. Tags can be passed as a string of
comma-separated values. You can learn more about tags
[here](/terminal-platform/custom-identifiers).
A specific provider you would like the customer to authenticate with - skips the first screen
Example: `geotab`
A list of provider codes that will be hoisted to the top of the provider selection list.
Example: `isaac`
Whether to automatically schedule future syncing after the initial sync
Allowed values: `automatic` `manual`
Number of days of historical data to backfill (can not use alongside
`backfill_start_from`)
ISO8601 date to start backfilling from (can not use alongside `backfill_days`)
Link template ID to use for the hosted Link flow. If omitted, Terminal uses
your application's default template. Templates can configure branding, custom
agreements, redirect defaults, sync mode defaults, backfill defaults, required
external IDs, and default tags.
Learn more in the [Consent Templates guide](/guides/consent-templates).
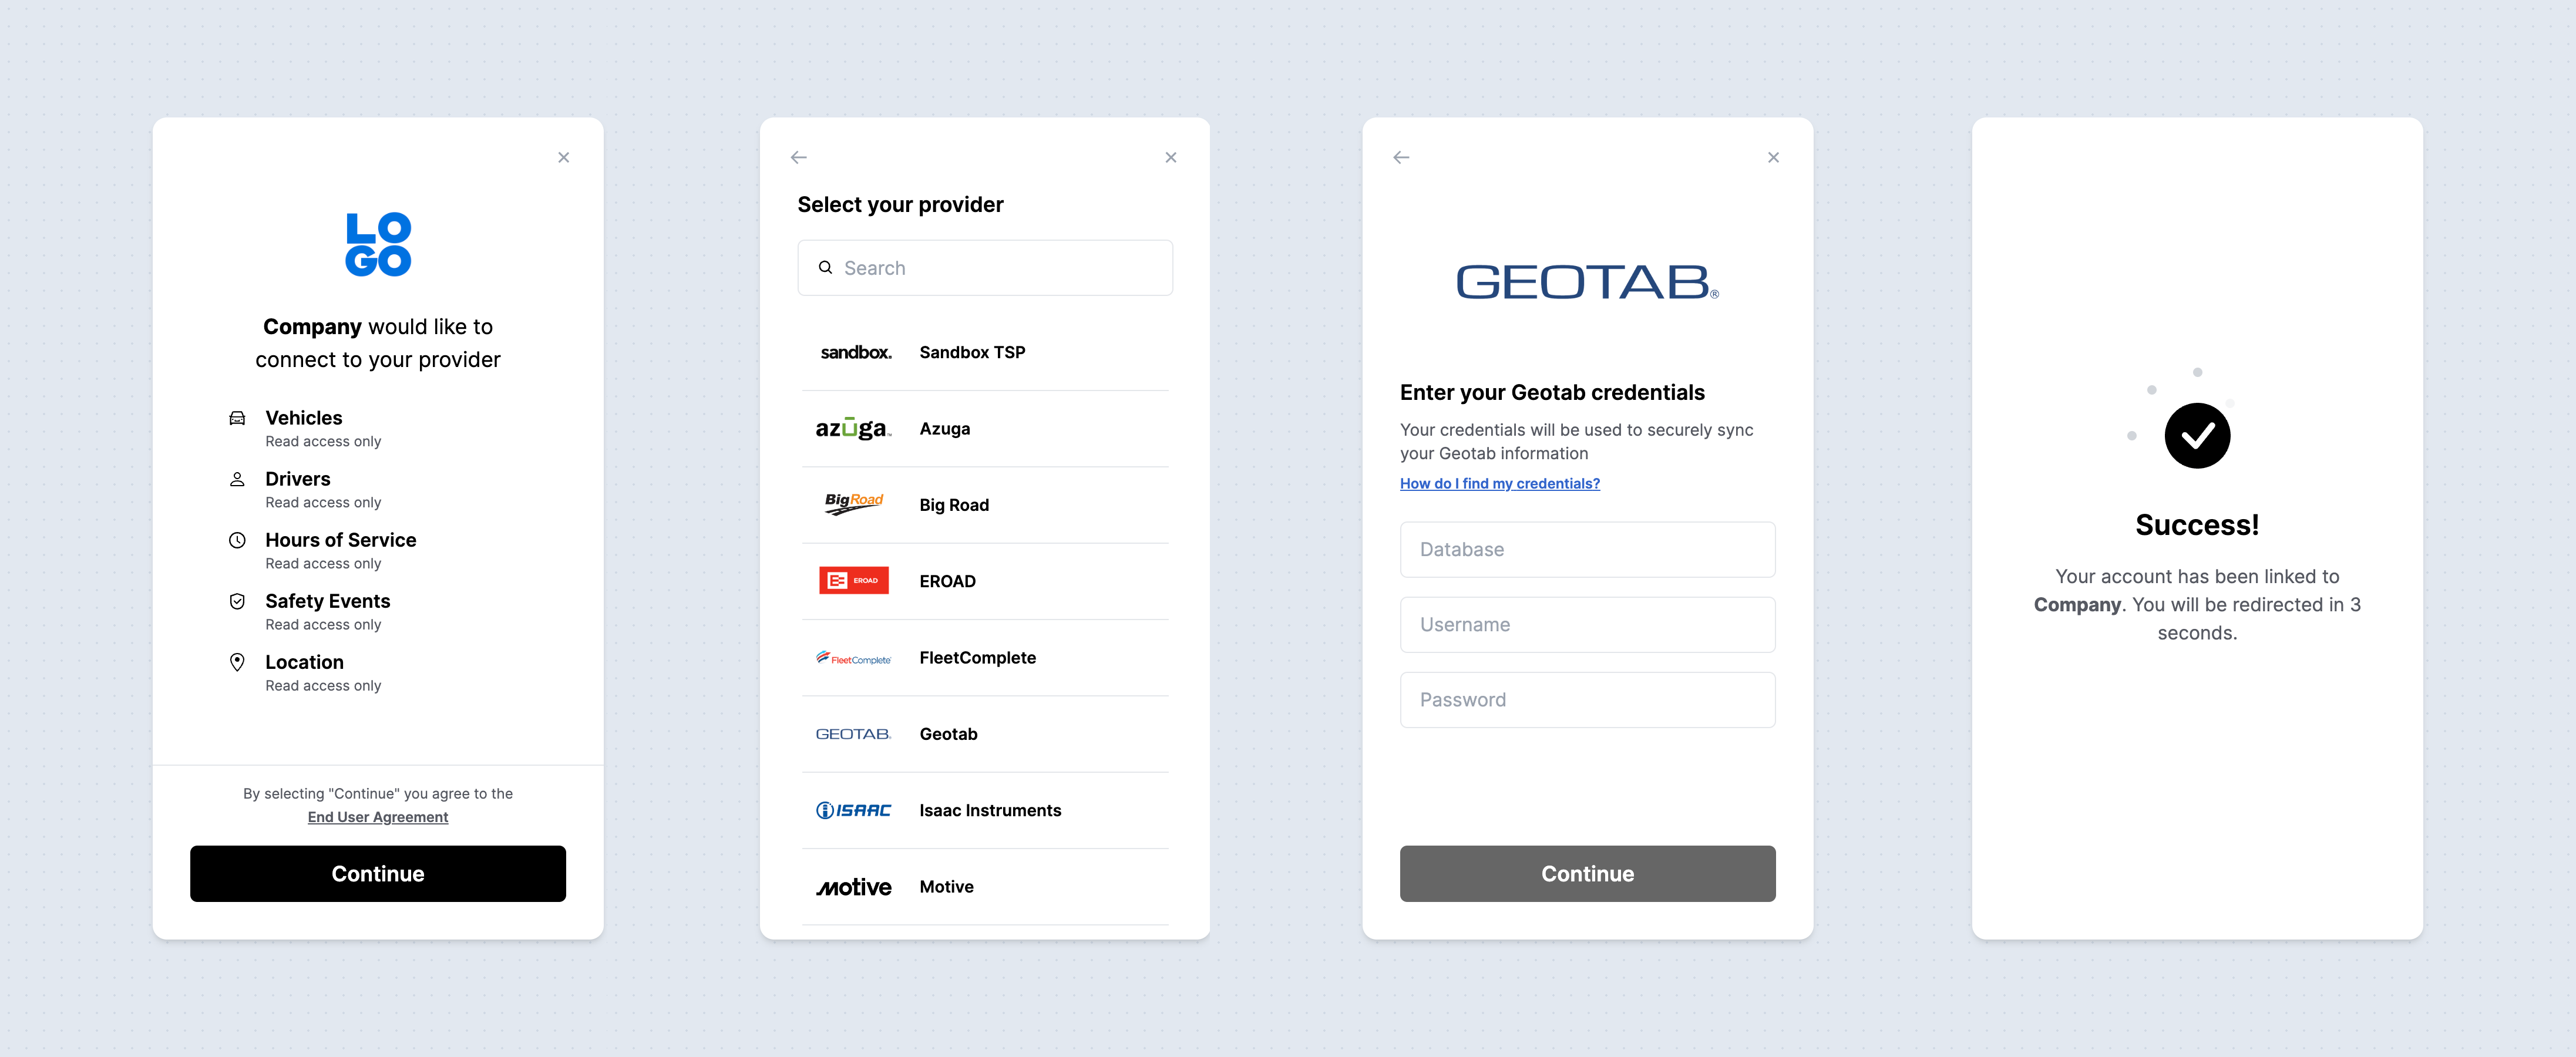 ## Accessing Terminal Link
Terminal Link is a user-friendly, hosted page designed to facilitate authentication with any telematics provider. It provides a simple, self-serve flow for customers or partners to connect their telematics accounts.
You have two options to integrate Terminal Link into your application:
1. Directly link to the hosted page.
2. Embed it within your application using one of our SDKs.
## Accessing Terminal Link
Terminal Link is a user-friendly, hosted page designed to facilitate authentication with any telematics provider. It provides a simple, self-serve flow for customers or partners to connect their telematics accounts.
You have two options to integrate Terminal Link into your application:
1. Directly link to the hosted page.
2. Embed it within your application using one of our SDKs.